Showing posts with label Configuration. Show all posts

How to Detect Hardware on Ubuntu Maverick Merkaat (10.10)

This time I want to share tips with you, how to detect keyboard in ubuntu .. for the first time you install ubuntu or you install a laptop / computer, so you do not know the specifications of the computer being installed ubuntu.

There is a miraculous way in ubuntu to detect the hardware or view specification laptop / computer. Immediately, we try :

First Step :

Using the application "lshw", this application-based terminal, so you can see the specifications of the laptop / computer using the terminal. How to install :

$ sudo su
$ apt-get install lshw

How to view the specifications with the command :

$ lshw

There are additional to view it using gedit, by type :

$ lshw > ~/Desktop/Spesc.txt

Second Step :

Using the lshw GUI-based application, the first way is to use a terminal mode. The second way to use GUI. To install it :

$ apt-get install lshw-gtk

Here is preview :


Happy Testing...!!
Read More...!!

Login to Ubuntu Using Face Recognition in Ubuntu Maverick Meerkat 10.10

In this post we will share tips to you I login in ubuntu using face verification. Surely you have to know? for those of you who do not know. I will try to share with you. Immediately, we begin.

Go to terminal, login as root by type :

$ sudo su

Then add third party from the PPA repository and update the repository using command :

$ apt-add-repository ppa:antonio.chiurazzi/ppa
$ apt-get update

Then install the application face trainer with the command :

$ apt-get install pam-face-authentication

When finished installing, now we add a configuration file for the "gdm and su", this configuration is to run the application face trainer to get the road when the gdm login, type the command :

$ gedit /etc/pam.d/gdm

Add "auth sufficient pam_face_authentication.so enableX" top row without "" (quotation). Then edit one file again :

$ gedit /etc/pam.d/su

Add "auth sufficient pam_face_authentication.so enableX" most of the same row without a sign "" (quotation).

Configuration :

Open Applications> Other> Qt Face Trainer, then the settings and input your photo here :

Step 1
Step 2
Step 3
Finish and happy Testing...!!
Read More...!!

Install Ubuntu Tweak 0.5.10 in Ubuntu Maverick Meerkat 10.10

Have not been posting here, because now to configure is user friendly, is easy and not complicated like the Ubuntu version of 7.10 Under. This time we will discuss how to install Ubuntu Tweak 0.5.10 version of the latest release.


First open a terminal and login as root by type :

$ sudo su

And Add Thir Party Repository by Type :

$ add-apt-repository ppa:tualatrix/ppa

Update repository then install ubuntu tweak 0.5.10 by type :

$ apt-get update 
$ apt-get install ubuntu-tweak

And Finish...!! You also can install manually by download deb package ubuntu tweak here :

http://launchpad.net/ubuntu-tweak/0.5.x/0.5.10/+download/ubuntu-tweak_0.5.10-1_all.deb
Read More...!!

Easy Way Fix Problem Grub Rescue On Windows 7 (Maverick Meerkat) Using Burg Manager

I've had problems with grub ubuntu, when I select the booting windows 7, it turns out there is a message "grub rescue". and I can not boot through windows 7, I finally took the initiative to check it through ubuntu. after I see it, it turns out that the partition in the grub list, is on sda3, however, the partition is on sda2. after I change to use:


$ sudo gedit /boot/grub/grub.cfg

There was still a "grub rescue", after that, I try to update the grub with the command :

$ sudo update-grub

After running the command above, the problem has not been fixed, and still can not boot windows 7. Then i try to delete grub ubuntu, go to grub rescue on windows 7 :

bcdedit /export C:\BCD_Backup
C:
CD Boot
Attrib bcd –s –h –r
ren c:\boot\bcd bcd.old
bootrec /RebuildBcd 

Then appear Messages :

“Scanning all disks for windows installations.
Please wait, since this may take a while…
Successfully scanned windows installations: 1
[1] C:\windows
Add installations to boot list? Yes(y)/No(N)/All(A) : “

And Press Y Enter

Then  : 

bootrec /fixmbr 
bootrec /FixBoot

After Finished, Grub is gone, but still can't booting from Window 7. Now, i finaly found solution from this problem.

Install Burg Manager.  from here or here, after installing burg manager, you will see message, An explanation more or less like this:  " i can fix this problem, problem is fixed "

Then you can booting from Windows 7. i finally found this solution by two day.
Read More...!!

Restore Default GNome Panel in Ubuntu Lucid Lynx (10.04)

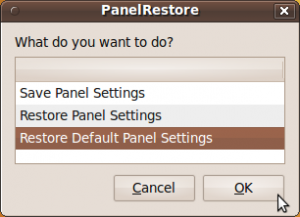
An easy way to restore gnome-panel in ubuntu Lucid Lynx is to use the restore panel program, which is a small scripting program that can help you to restore gnome panel by default. to restore this panel, you can download here

When finished downloading, extract the file, then double-click, the selection window will appear. select "Run" 


Select "restore defaut setting panel" then press OK. Gnome panel will change by default the same as when you first install. if there is still no change, restart your computer. good luck
Read More...!!

Install Ubuntu Tweak 0.5.5 In Ubuntu Lucid Lynx (10.04)

Ubuntu tweak 0.5.5 has been released now you can configure ubuntu easily using this application, here for install this application. just download it then install it :


Download click on Pictures


TITLE-IMAGE


After downloaded it you can install it by double click.

Happy Testing....!!
Read More...!!

Upgrade And Install Latest Driver Intel Version 2.12 On Ubuntu Lucid Lynx (10.04)

Latest driver install now avalible to upgrade, now you can upgrade it using third party repository from PPA, to upgrade this driver, login as root then add repository third party by type :


$ sudo su
$ gedit /etc/apt/source.list

Add this line :

deb http://ppa.launchpad.net/xorg-edgers/ppa/ubuntu lucid main #xorg-edgers PPA
deb-src http://ppa.launchpad.net/xorg-edgers/ppa/ubuntu lucid main #xorg-edgers PPA

Update repository, but before that. add key server :

$ sudo apt-key adv --recv-keys --keyserver keyserver.ubuntu.com 8844C542
$ sudo apt-get update
$ sudo apt-get dist-upgrade

Now latest driver is installed, but we need latest linux kernel 2.35-6, now we should install it :

$ sudo apt-get install linux-image-2.6.35-6-generic linux-headers-2.6.35-6-generic

Restart your machine by type :

$ reboot

Now latest driver intel has installed, and you can see of the smooth acceleration.
Happy Testing...!!
Sources : http://www.howtoforge.com/how-to-install-latest-intel-driver-2.12-on-ubuntu-10.04-lucid-lynx
Read More...!!

Playing Music On Ubuntu Terminal Using MOC (Music On Console)

MOC (music on console) is a console audio player for LINUX/UNIX designed to be powerful and easy to use. You just need to select a file from some directory using the menu similar to Midnight Commander, and MOC will start playing all files in this directory beginning from the chosen file. 
There is no need to create play lists like in other players. Supported file formats are: mp3, Ogg Vorbis, FLAC, Musepack, Speex, WAVE, AIFF, AU (and other less popular formats supported by libsndfile. New formats support is under development.


To install it add third party repository go to terminal, login as root by type :

$ sudo su
$ gedit /etc/apt/sources.list

Add following line 

deb http://www.lxtec.de/debarchiv unstable main
deb-src http://www.lxtec.de/debarchiv unstable main

$ apt-get update
$ apt-get install moc

If firts steps fail you can download this packgaes here....
Read More...!!

Intall PWGEN (Random Password Generator) In Ubuntu Lucid Lynx (10.04)

Pwgen is a command line utility to generate a block of random passwords, You can intall it from terminal, login as root by type :


$ sudo su
$ apt-get install pwgen

To run this program just type

$ pwgen

Run uuidgen to generate random password by type :

$ uuidgen

For more info, please visit : http://ubuntuguide.org/wiki/Ubuntu:Lucid

Happy Testing....!!
Read More...!!

Desktop Background Video In Ubuntu Lucid Lynx (10.04)

You can change ubuntu desktop background using video, this is maybe old trick. But if you're new  to know it hopefully useful. We need to install some packages : zenity, mplayer dan xwinwrap. go to terminal, login as root by type :

$ sudo su
$ apt-get install zenity mplayer

Then donwload xwinwrap here....!!. Extract this package and move to /usr/bin/ open /usr/bin/ and run i-winwrap then you can see window here :


Select movie to using it as desktop background, choose video  for your desktop background, and will appeaer option to play sound next you can set tranparency video by loop and finish...

Happy Testing.....!!!
Read More...!!

Install Modem Huawei E1550 In Ubuntu Lucid Lynx (10.04)

It was long time not to update blog post, now i will start from install modem huawei E1550 in ubuntu lucid lynx, i always changed mannualy if using it, but we need to install usb_modeswitch package, and also to edit /etc/usb_modeswitch.con.


Now, Create a new rule for udev by type :

$ sudo su
$ gedit /etc/udev/rules.d/15-huawei-155x.rules


Type the following:

SUBSYSTEM=="usb",
ATTRS{idProduct}=="1446",
ATTRS{idVendor}=="12d1",
RUN+="/lib/udev/modem-modeswitch --vendor 0x$attr{idVendor} --product 0x$attr{idProduct} --type option-zerocd"


Now save and exit. plug in your modem device,  now go to System > Preferences > Network Connections and set your APN, Username and Password GSM card, Now u can connect and you can start to surf internet.


Happy Testing.....!!!
Read More...!!

Install MySQL and create Database in ubuntu Karmic Koala (9.10)

MySQL is a relational database management system (RDBMS) that runs as a server providing multi-user access to several databases. in ubuntu, you can create database from mysql but before create database you can install this packages, to install it follow this step :


Go to terminal and login as root by type :

$ sudo su
$ apt-get install apache2

Now install MySQL by type :

$ apt-get install mysql-server

Install php for Apache web server by type : 

$ apt-get install php5 

Then Install MySQL for Apache by type :

$ apt-get install php5-mysql

Dont forget type root password for mysql, after installation finished, restart mysql by type:

$ sudo /etc/init.d/mysql start

Create Database

Now you can create database or table database by using terminal and type :

$ mysql -u root -p

Create database by type :

$ create database database_test;

To using and editing your database, you can use this command :

$ use database_test;

Happy Testing.....!!
Read More...!!

Install And Configure phpMyAdmin In Ubuntu Karmic Koala (9.10)

This time we will discuss how the installation and configuration of phpmyadmin on ubuntu karmic koala (9.10), phpmyadmin is application web interface to manage database, like MySQL, php and etc. to install phpmyadmin in ubuntu karmic koala, follow these steps :


Go to terminal login as root by type :

$ sudo su
$ apt-get install phpmyadmin

Edit file apache2.conf in directory /etc/apache2/ by type :
$ gedit /etc/apache2/apache2.conf

Alias /moodle "/usr/share/phpmyadmin/"

(Directory "/usr/share/phpmyadmin//")
<
AllowOverride None
Options Indexes MultiViews
AddHandler type-map var
Order allow,deny
Allow from all
LanguagePriority en cs de es fr it nl sv pt-br ro

(/Directory)

Change sign () by <>

Open web browser and type : http://localhost/phpmyadmin, now you can see phpmyadmin interface. for more complete data base management on the web interface, you can install xampp here or here

Happy Testing...!!
Read More...!!

Install Open Office 3.2.0 in Ubuntu Karmic Koala (9.10)

Openoffice 3.2.0 has been released, in ubuntu karmic koala (9.10) you can be installed this version by downloading package here. if .deb packages have downloaded, follow these steps :


Go to terminal and login as root by type :


$ sudo su

Extract file have you downloaded by type :

$ tar xzvf OOo_3.2.0_LinuxIntel_install_en-US_deb.tar.gz

There is an old package that must be uninstalled before installing open office version 3.2.0 is : OOO320_m12_native_packed-1_en-US.9483, if you want to remove older version by type :


$ apt-get remove openoffice*.*

Go to extracted directory OOO320_m12_native_packed-1_en-US.9483/DEBS/ and install all packages by type :


$ dpkg -i *.deb

Go to directory OOO320_m12_native_packed-1_en-US.9483/DEBS/desktop-integration/ install openoffice.org3.2-debian-menus_3.2-9472_all.deb for menu on Application by type :


$dpkg -i openoffice.org3.2-debian-menus_3.2-9472_all.deb

For new feature, check here
Finish And Happy Testing...!!
Read More...!!

Upgrade PulseAudio 0.9.21 in Ubuntu Karmic Koala (9.10)

PulseAudio on ubuntu karmic koala (9.10) by default installed version 0.9.20, the latest version of PulseAudio is 0.9.21, in this version of the existing bugs in previous versions have been fixed to upgrade to the latest version is 0.9.21 follow these steps :


Go to terminal, login as root and add PPA repository by type :

$ sudo su

$ add-apt-repository ppa:ubuntu-audio-dev/ppa

Update repository and Upgrade PulseAudio by type :

$ apt-get update && sudo apt-get dist-upgrade

After finish, now you have latest version of PulseAudio.

Happy Testing...!!
Read More...!!

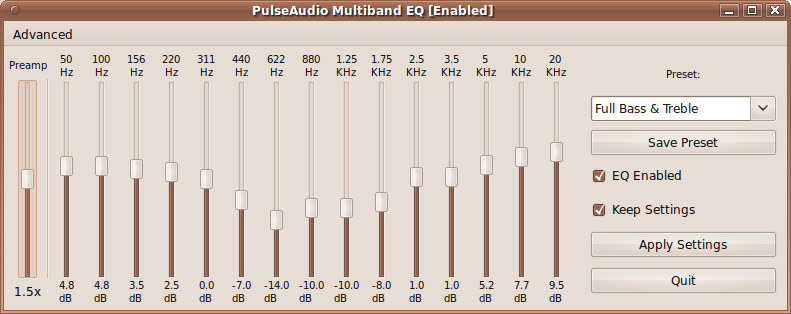
Install System Wide PulseAudio Equalizer On Ubuntu Karmic Koala (9.10) Lucid Lynx (10.04)

System wide equalizer in the development of PulseAudio PulseAudio for clearer sound developed by psyke83, now on ubuntu karmic koala (9.10) and ubuntu lucid lynx can be installed by adding the PPA, to install it follow these steps :


Login as root by type :

$ sudo su

Add PPA repository :

$ add-apt-repository ppa:psyke83/ppa

Update repository by type :

$ apt-get update

Then install system wide PulseAudio by type :

$ apt-get install pulseaudio-equalizer

Finish and Happy Testing...!!
Read More...!!

Diasble File Browser Password in Ubuntu Karmic (9.10) and Jaunty (9.04)

In ubuntu karmic koala (9.10) and jaunty jackalope (9.04) when we using file browser to find ore open file we always ask for root password to acces file browser, to disable it follow this steps :


Open Terminal and login as root by type :

$ sudo su

Edit file org.freedesktop.devicekit.disks.policy by type :


$ gksudo gedit /usr/share/polkit-1/actions/org.freedesktop.devicekit.disks.policy

Find this line :

<allow_active>auth_admin_keep</allow_active>

And change it to :

<allow_active>yes</allow_active>

Save and restart your machine, Happy Testing....!!
Read More...!!

Remove Old Kernel Linux-Image in Ubuntu Karmic Koala (9.10)

When we upgrading kernel or linux images, the oldest kernel does not remove automatically. So that when we boot or start ubuntu, grub will appear on the new kernel and the old kernel so that it meets the grub display and can be very disturbing view of grub. to remove it,  follow these steps: 


Login as root and view oldest kernel grub you want to remove by type :

$ sudo su


$ dpkg --get-selections | grep linux-image

And will appear :

linux-image-2.6.31-13-generic
linux-image-2.6.31-14-generic
linux-image-2.6.31-15-generic

Now remove oldest kernel by type :

$ apt-get purge linux-image-2.6.31-13-generic

Or

$ apt-get remove linux-image-2.6.31-13-generic

Restart your machine and oldest kernel have been removed.

Happy Testing...!!
Read More...!!

Configure File Sharing On Ubuntu Karmic Koala (9.10) Using Ubuntu One

Ubuntu One is a storage application and service operated by Canonical Ltd and currently in public beta.The service enables users to store and sync files online and between computers.

To configure file share using ubuntu one, go to Applications > Internet > Ubuntu One and you will see this icon on top right of panel on screen, create folder for share, select share tab and click install service


And Now,you can check “Share this folder” and two options below.Click on Create share,choose “Add the permissions automatically”(or manually change permissions in folder properties window).

Happy Testing....!!

Sources :

Read More...!!

Add Printer Canon MP140 in Ubuntu Karmic Koala (9.10)

Printer Canon MP140 on ubuntu is already support in database ubuntu, but when I find kind pixma, the smallest type is MP150. how to install it? don't worry, in fact if you just for printing MP145 can use MP150 driver, and will be able to print deafault. to add a printer on ubuntu, follow these steps :


Go to System > Administration > Printer > 

Add Printer and choose on the database MP150 driver. dont forget plug the cable. Finish!! Now test printing. I dont know yet if want to copy and scan, hopefully I will discuss this in the next post

Happy Testing....!!
Read More...!!